1. Cryptography
In this lesson we will cover a few cryptographic concepts along with the related fields of digital forensics and steganography. Cryptography is the process of encoding or decoding messages and data. In this lesson we will learn about cryptography in three broad sections, ciphers, encryption, and hashing. Although cryptography is widely used in computer systems today, mostly in the form of encryption and hashes, some cryptographic techniques have been in use since the days of Julius Caesar and the Roman Empire.
1.1 Ciphers
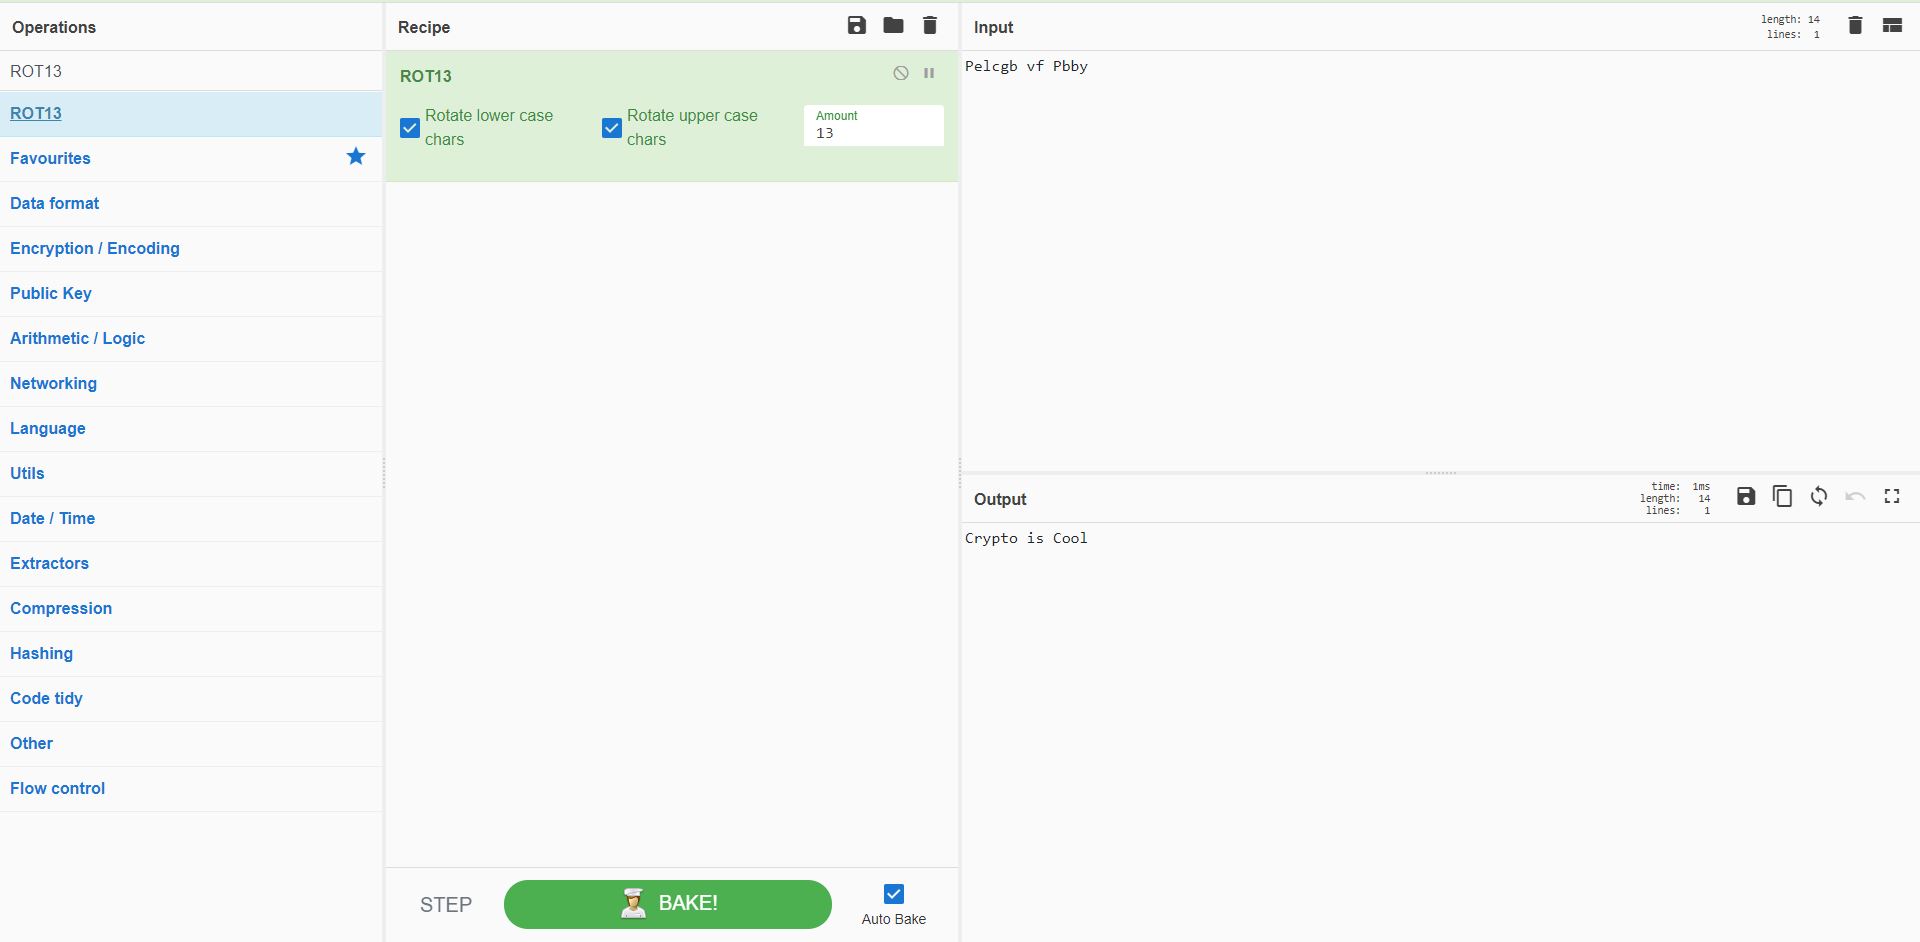
One of the earliest records of cryptography is the Caesar Cipher. The Caesar Cipher is a form of shift cipher and was developed during the reign of Julius Caesar for the Roman Empire to safely convey military messages. The Caesar Cipher, also known as a Rotation, or ROT, Cipher, works by shifting each letter of the alphabet over by a certain number of places. For example, a Caesar Cipher with a shift of two would take the letter “A” and “shift” it two places down the alphabet to “C.” In other words, to encode a message using the Caesar Cipher with a shift of two, “A” would be replaced with “C,” “B” would be replaced with “D,” and so on until the end of the alphabet where the shift raps around, “Y” would become “A” and “Z” would be replaced with “B.” To decode a ROT Ciphered message with a shift of two, you would reverse the encoding processes; replacing “C” with “A,” “D” with “B,” and so on. To demonstrate this technique, let us encode and decode a message using the ROT13, or Rotation 13, cipher. The ROT13 cipher is the same as a Caesar Cipher with a shift of 13. Starting with a plaintext message of “Crypto is Cool” we will shift each letter 13 places in the alphabet. “C” is shifted to “P,” “r” raps back around and becomes “e.” This process is continued until all of the lettered are ciphered, which result in the ciphertext message, “Pelcgb vf Pbby.” To decode the message, we reverse the process and shift “P” back to “C” and “e” back to “r” until the message is decoded. To make this process easier and faster, many cryptographic tools and application have been developed. CyberChef is a free and open-source cryptographic tool that is included in the CTFA toolkit. Click here to open CyberChef in a new tab. Let use decode our message again, this time using CyberChef. In the side-bar menu of CyberChef search for the “ROT13” cipher. Next click and drag the cipher into the “Recipe” box. Now, enter the ciphertext, “Pelcgb vf Pbby,” into the “Input” box and click “Bake!” You should now see the decoded plaintext message, “Crypto is Cool,” in the “Output” box.
2. Digital Forensics
Digital forensics is the analysis and investigation of digital data, and digital forensics can take many forms, from analyzing an entire hard drive or individual files to investigating computer network traffic (We will cover network forensics in a later lesson). In this lesson we will focus on analyzing individual files and determining file types. There are countless different types of files, some of the more common file types include text files, Microsoft Word Documents, PNG picture files, and executable files. Most of the time a file can be identified by the file extension, the few letters after the dot (“.”). For example, a text file has an extension of “.txt,” a Word Document has an extension of “.docx,” a PNG’s extension is “.png,” and executable files use the “.exe” extension. However, file extensions can be changed; thus, a file’s extension is not always correct. For example, a file can have an extension of “.exe” but not be an executable file. To identify a file without the correct file extension, we must look elsewhere for an indication of the file type. A reliable way to properly identify a file is by looking at it’s “file signature.” A file signature, sometimes referred to as the “file header” is a few bytes of data found at the beginning of a file that is unique to each file type. Many file types have signatures that correspond to the file’s proper extension; for example, the file signature for a PNG picture file is “PNG.” This makes identifying some files very easy. There are many programs that allow you to view the file signature of a file; for simplicity sake, we will use the Microsoft Notepad application that is preinstalled on Windows. To open a file in Notepad, right-click on the file and select “Open with” and find the “Notepad” application (you may have to click “Show more applications” to see the “Notepad” option). Now that the file is open in notepad, we can see the file signature. The first few bytes of a “.png” file are “.PNG”. This indicates that the file is a PNG file. After properly identifying a file’s type, we can close notepad and append the correct file extension. To do this, right-click the file and select “Rename.” Now replace the incorrect file extension with the extension of the file type identified by the file signature and save the file (If prompted with a warning about changing file extensions, click “Ok”). Finally, double-click the file to view it to open it in its native application. Changing file extensions can be used to hide a malicious file in plain sight; however, using digital forensics, the true file type can be discovered.
3. Steganography
Steganography, abbreviated as stegano, is the technique of hiding messages or data within other messages and data. For example, the following sentence contains a secret message: “Since everyone can read, encoding text in neutral sentences is doubtfully effective”
Although that sentence may seem oddly structured, it is hiding a secret message. One simple text-based steganographic method is to hide a message in the first letter of each word in a sentence or paragraph. By applying this method to the above sentence, the message “Secret inside” is reveled. There are countless steganographic methods that can be used to hide messages within other data; for this lesson we will focus on file-based steganography.
3.1 File Steganography
Much like text steganography hides messages within text, file steganography is used to hide messages or files within a file. As you learned in the forensics section above, files can be viewed and edited at the hexadecimal level. This technique can be used to hide messages within normal files. For example, a user can open a PNG file in a hex editor and add a message at the end of the file by simply adding text after the “end of file” indicator. Just like a file header indicates the beginning of a file, the “end of file” signature denotes the end of a file and informs a program to stop reading the file at that point. This can be leveraged to hide a message at the end of a file without corrupting the data. Although a hex editor program is necessary to write the message in the file, simple plaintext messages can be read using a simple text editor program, such as Microsoft notepad.
To investigate a suspicious file for steganography, first open the file in its native application; for example, open a picture file in a picture viewing application. Most steganographic files will appear normal at first glance, but a thorough investigation should start at the surface and then dig deeper. To check for any hidden messages at the end of a picture file, first right click the file and select “Open with” and find the “Notepad” application (you might have to click “Show more applications” to see the “Notepad” option). Now that the file is open in notepad, you can check the file for hidden messages. At the bottom of the file there is the “end of file” signature, denoted by “IEND,” after this signature, a secret message can be appended and not affect the functionality of the file. The screenshot below shows a secret message at the end of a PNG file.

Now it’s time to use what you have learned in this lesson to solve a few challenges!